Unit Testing with Junit
Posted in testing on August 15, 2016 by Adrian Wyssmann ‐ 3 min read
Unit testing refers to testing of individual units of source code or as written in Wikipedia
unit testing is a software testing method by which individual units of source code, sets of one or more computer program modules together with associated control data, usage procedures, and operating procedures, are tested to determine whether they are fit for use.
Let’s do a simple example. Let’s create our own shell/console in java with expects a simple user input and the does a desired action based on the entered command. Ideally you would follow the TDD approach where you first write your test, implement the productive code, but for simplicity I just write some code and then write the tests for it.
/**
 *
 */
package com.wyssmann.sampleapps.simpleconsole;

import java.util.Scanner;

/**
 * @author wyssmana
 *
 */
public class SimpleConsole {
    private static String EXIT = "exit";
    private static String UNKNOWN = "unknown";

    public SimpleConsole() {

    }

    /**
     * @param args
     */
    public static void main(String[] args) {
        String s;
        Scanner reader = new Scanner(System.in);
        while (true) {
            System.out.print(">");
            s = reader.next();
            String command = parse_input(s);
            if (command.equals(EXIT)) {
                break;
            } else {
                System.out.println("'"+command+"' unknown");
            }

        }
        reader.close();
        System.out.println("You are done, have a nice day!");
    }

    /**
     * @param input Arbitray input string
     * @return     command which user entered (ignoring all attributes)
     */
    public static String parse_input(String input) {
        String[] arguments = input.split(" ");
        return arguments[0];
    }
}
As you can see there is a method parse_input(String input) which we can test. In order to do so you need a unit test framework, which provides you the necessary harness to implement and run units tests for your code. In case of Java it is JUnit. Unit tests are usually written in a separate class and annotated with @Test. The class needs to import the appropriate package org.junit.Test:
package com.wyssmann.sampleapps.simpleconsole.tests;

import org.junit.Assert;
import org.junit.Test;

import com.wyssmann.sampleapps.simpleconsole.SimpleConsole;

public class SimpleConsoleTests {

    @Test
    public void returnExitOnExitCommand() {
        String  retval = SimpleConsole.parse_input("exit test");
        Assert.assertEquals("exit", retval);
    }

    @Test
    public void returnEchoOnEchoCommand() {
       String retval = SimpleConsole.parse_input("echo test");
       Assert.assertEquals("echo",  retval);
    }
}
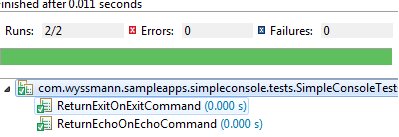
To run the tests, a test runner is required. usually your IDE has a native graphical runner built in.

You can also run it on the command line
[adrian@archlinux]$ java org.junit.runner.JUnitCore com.wyssmann.sampleapps.simpleconsole.SimpleConsoleTests
JUnit version 4.12
..
Time: 0.003

OK (2 tests)
Calling it from command line may be a bit tricky. First lensure that junit-x.x.jar and hamcrest-core-x.x.jar are in your classpath. Here some common errors and appropriate measures
java.lang.IllegalArgumentException: Could not find class [com.wyssmann.sampleapps.simpleconsole.SimpleConsoleTests]- ensure
.is part of your classpath
Exception in thread "main" java.lang.NoClassDefFoundError: SimpleConsoleTests (wrong name: com/wyssmann/sampleapps/simpleconsole/SimpleConsoleTests)- for packages, call the package from package base instead of calling the test class from within a package folder