Title here
Summary here
Posted in automation, linux on September 28, 2016 by Adrian Wyssmann ‐ 10 min read
Update 20. Sep. 2017: Fix typo in Set-Item -Path "WSMan:\localhost\Service\AllowUnencrypted" -value True
According to the official homepage
Ansible is a radically simple IT automation engine that automates cloud provisioning,configuration management, application deployment, intra-service orchestration, and many other IT needs.
The really cool thing is, no agents are needed as all activities go over ssh. I will not go into details here as it is indeed very good explained in the intro video from the Ansible website and the intro getting started
For my first steps, I will setup a virtual test environment on my computer, using Virtualbox. Here you can see the details:
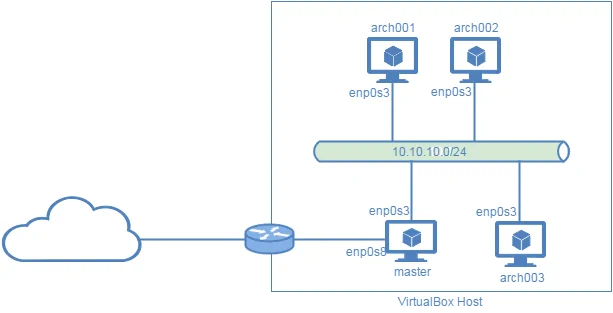
arch001 to arch003 are the managed nodes, which I orchestrate with control node “master”.
Master is running Antergos Linux. To install and configure ansible the following steps have to be performed
Ansible should be available in your package repository, otherwise checkout the Ansible Website for more info.
[adrian@master]$ pacman -S ansible
resolving dependencies...
looking for conflicting packages...Packages (1) ansible-2.1.1.0-1Total Installed Size:  22.06 MiB
Net Upgrade Size:       0.00 MiB:: Proceed with installation? [Y/n]
(1/1) checking keys in keyring                         [#############################] 100%
(1/1) checking package integrity                       [#############################] 100%
(1/1) loading package files                            [#############################] 100%
(1/1) checking for file conflicts                      [#############################] 100%
(1/1) checking available disk space                    [#############################] 100%
:: Processing package changes...
(1/1) reinstalling ansible [#############################] 100%It’s recommended to use ssh keys to do the authentication rather than using passwords. So let’s create the necessary rsa key pair. I choose not to use a passphrase.
[adrian@master]$ ssh-keygen
Generating public/private rsa key pair.
Enter file in which to save the key (/home/papanito/.ssh/id_rsa):
Created directory '/home/papanito/.ssh'.
Enter passphrase (empty for no passphrase):
Enter same passphrase again:
Your identification has been saved in /home/papanito/.ssh/id_rsa.
Your public key has been saved in /home/papanito/.ssh/id_rsa.pub.
The key fingerprint is:
SHA256:AyTOlbHs+jIa7l595LEgWKHEtUxr8vbgP6kxwpuzwi8 papanito@host
The key's randomart image is:
+---[RSA 2048]----+
| ...= +o         |
| ..* O..         |
|  o O +          |
|   * . .         |
|  . = o S        |
| . o * + +       |
|. + * o.+        |
|.E.*o=o.         |
| +@=.+o.         |
+----[SHA256]-----+In my test setup, all nodes are connected in a private network 10.10.10.0/24 without any infrastructure services like dhcp or dns. Therefore I will configure all nodes using static addresses.
Specify hostname “master” in /etc/hostname
Specify host names for control node and client nodes in /etc/host
#
## /etc/hosts: static lookup table for host names
##<ip-address>  <hostname.domain.org>   <hostname>

127.0.0.1       localhost.localdomain   localhost
::1             localhost.localdomain   localhost
127.0.0.1       master.localdomain      master
::1             master.localdomain      master
10.10.10.11     arch001.localdomain     arch001
10.10.10.12     arch002.localdomain     arch002
10.10.10.13     arch003.localdomain     arch003
## End of file
Configure interface enp0s3 to have a fix IP. I just use the NetworkManger (GUI) in this case.
At the ansible into you can find details about the requirements for the managed node. In my case I have ssh running, so that I remotely can connect to the managed node from the control node. The easiest way to do so is by using the ssh-key generated above.
Again, I use static ip addresses and the hosts file for name resolution.
Configure a network interface for the internal network 10.10.10.0/24. I do this according to ArchWiki by using systemd-networkd by providing appropriate network configuration in /etc/systemd/network/wired.network.
[Match]
Name=enp0s8

[Network]
Address=10.10.10.11/24
Gateway=10.10.10.1
Specify hostname “master” in /etc/hostname
Specify host names for control node and client nodes in /etc/hosts
#
## /etc/hosts: static lookup table for host names
##<ip-address>  <hostname.domain.org>   <hostname>
127.0.0.1       localhost.localdomain   localhost
::1             localhost.localdomain   localhost
127.0.0.1       archxxx.localdomain     archxxx
::1             archxxx.localdomain     archxxx
10.10.10.10     master.localdomain      master
10.10.10.11     arch001.localdomain     arch001
10.10.10.12     arch002.localdomain     arch002
10.10.10.13     arch003.localdomain     arch003

## End of fileTo use my recently created public key to authenticate on the node, I need to copy it to the managed node(s). On the managed nodes I currently only have one user “root” which I will use for further activities. Therefore, the key is copied to root user:
[adrian@master]$ ssh-copy-id root@arch001
The authenticity of host 'arch001 (10.10.10.11)' can't be established.
ECDSA key fingerprint is SHA256:164NF5aoQvB49Y5R+crNjcLLqlakhs8moGQaxp2Ib1A.
Are you sure you want to continue connecting (yes/no)? yes
/usr/bin/ssh-copy-id: INFO: attempting to log in with the new key(s), to filter out any that are already installed
/usr/bin/ssh-copy-id: INFO: 1 key(s) remain to be installed -- if you are prompted now it is to install the new keys
root@arch001's password:Number of key(s) added: 1Now try logging into the machine, with:   "ssh 'root@arch001'"
and check to make sure that only the key(s) you wanted were added.My managed nodes are using Arch, which uses Python3 by default. Therefore I need to ensure that python2 is installed on my managed nodes. I can do this by installing directly on the nodes or via the raw module from ansible.
[adrian@master]$ ansible arch001 -u root -m raw -a "pacman -S --noconfirm python2"
arch001 | SUCCESS | rc=0 >>
resolving dependencies...
looking for conflicting packages...Packages (1) python2-2.7.12-1Total Installed Size:  71.47 MiB:: Proceed with installation? [Y/n]
(1/1) checking keys in keyring                     [######################] 100%
(1/1) checking package integrity                   [######################] 100%
(1/1) loading package files                        [######################] 100%
(1/1) checking for file conflicts                  [######################] 100%
(1/1) checking available disk space                [######################] 100%
:: Processing package changes...
(1/1) installing python2                           [######################] 100%
Optional dependencies for python2
tk: for IDLE
python2-setuptools
python2-pip
As you can see I provide the “-noconfirm” parameter to pacman as otherwise the process simply waits for confirming the installation of the package.
After the initial setup, my nodes are up and running and connected via the virtual network. Now I need to start configuring ansible.
A central point for ansible is the inventory file (/etc/ansible/hosts) from which ansible knows the systems which it orchestrates. I uses an INI-like format in which you can provide groups of hosts. Ansible may then address single nodes or even group of nodes. Here is my example
[web]
arch001
arch002

[db]
arch003

[web:vars]
ansible_python_interpreter=/usr/bin/python2

[db:vars]
ansible_python_interpreter=/usr/bin/python2
You can see that I have also specified group variables, that is due to the fact that my nodes arch001 to arch003 are running
Arch Linux which uses Python3 as default Python interpreter at /usr/bin/python. Therefore I have specified ansible_python_interpreter=/usr/bin/python2 in my groups so for this nodes, the python interpreter used is /usr/bin/python2.
I run ansible as user papanito and not as root, but my managed nodes only have root user. So if I
run a command, ansible will complain.
[adrian@master]$ ansible arch001 -m ping
 arch001 | UNREACHABLE! => {
 "changed": false,
 "msg": "Failed to connect to the host via ssh.",
 "unreachable": true
}
Therefore I have to specify the remote user either as parameter or in /etc/ansible/ansible.cfg, then the command will succeed:
[adrian@master]$ ansible arch001 -m ping -u root
  arch001 | SUCCESS => {
  "changed": false,
  "ping": "pong"
}
Done with my Linux nodes.
Now this was quite easy. But usually you do not have a homogeneous environment with only Linux nodes but most probably also Windows hosts. Therefore I want to also manage a Windows node, more precisely a Windows 2012 Server core (no GUI). Let’s name our host win001 and give it an ip 10.10.10.21. I recommend to checkout the wiki from Ansible regarding Windows support:
http://docs.ansible.com/ansible/intro_windows.html.
Setup should be simple, as I do not have an Active Directory for user authentication nor do I have any windows domain policies which prohibits me to enable power-shell remoting or even a company firewall in between which could play into the setup. You should not forget theses things when you want to setup something like ansible in your company’s environment.
However, I will do some security tradeoff and only setup un-encrypted basic authentication via http. The ansible wiki does show much more details for setting up a windows host considering security relevant authentication. It also provides Powershell script to ease the setup of a windows node.
That ansible can talk with Windows nodes it needs the “winrm” module. It can be installed with pip. As my control node uses Arch Linux (default Python3) we need to install the package “python2-pip” before we can install the module.
[adrian@master]$ pacman -S python2-pip
....
[adrian@master]$ pip2 install "pywinrm>=0.1.1"
....The new Windows node needs to be added to the inventory file. We put it in a separate group for obvious reasons:
[web]
arch001
arch002

[db]
arch003

[windows]
win001

[web:vars]
ansible_python_interpreter=/usr/bin/python2

[db:vars]
ansible_python_interpreter=/usr/bin/python2
For the [windows] group we now create the
group variables under group_vars/windows.yml. It is recommended to encrypt the file as it contains sensitive information (Admin password). However I will skip this for my test
ansible_user: Administrator
ansible_password: SecretPasswordGoesHere
ansible_port: 5986
ansible_connection: winrm
## The following is necessary for Python 2.7.9+ when using default WinRM self-signed certificates:
ansible_winrm_server_cert_validation: ignoreAs the Linux nodes, the Windows node also needs a static ip address. Additionally we will turn the firewall of. Sure, in a real environment I would probably do a more sophisticated configuration rather than just switching the firewall off, but for my testing that’s fine.
Configure the network interface for the internal network 10.10.10.0/24 and Hostname using sconfig.cmd
Disable firewall
C:\Users\Administrator> netsh advfirewall set allprofiles state off
OK
Add host name win001 on control node in __/etc/hosts
#
## /etc/hosts: static lookup table for host names
##<ip-address>  <hostname.domain.org>   <hostname>
127.0.0.1       localhost.localdomain   localhost
::1             localhost.localdomain   localhost
127.0.0.1       master.localdomain      master
::1             master.localdomain      master
10.10.10.11     arch001.localdomain     arch001
10.10.10.12     arch002.localdomain     arch002
10.10.10.13     arch003.localdomain     arch003
10.10.10.21     win001.localdomain      win001

## End of file
Now let’s test the connection and ping the windows host from the control node
[adrian@master]$ ping win001
PING win001.localdomain (10.10.10.21) 56(84) bytes of data.
64 bytes from win001.localdomain (10.10.10.21): icmp_seq=1 ttl=128 time=0.531 ms
64 bytes from win001.localdomain (10.10.10.21): icmp_seq=2 ttl=128 time=0.237 msA prerequisite is that Powershell which should be at least version 3.0. Let’s check that
PS C:\Users\Administrator> $PSVersionTable
Name                           Value
----                           -----
PSVersion                      3.0
WSManStackVersion              3.0
SerializationVersion           1.1.0.1
CLRVersion                     4.0.30319.17929
BuildVersion                   6.3.9600.16406
PSCompatibleVersions           {1.0, 2.0, 3.0}
PSRemotingProtocolVersion      2.2
So far so good, now let’s enable Remote-Powershell as described at https://technet.microsoft.com/en-us/library/jj592692(v=ws.11).aspx#BKMK_1.7
C:\Users\Administrator> powershell
PS C:\Users\Administrator>Enable-PSRemotingNow it seems we are done, so let’s test it
[adrian@master]$ ansible windows -m win_ping
win001 | UNREACHABLE! => {
  changed": false,
  msg": "ssl: HTTPSConnectionPool(host='win001', port=5986): Max retries exceeded with url: /wsman (Caused by NewConnectionError('<requests.packages.urllib3.connection.VerifiedHTTPSConnection object at 0x7f85f4722d10>: Failed to establish a new connection: ##red##[Errno 111] Connection refused',))",
  "unreachable": true
}
Oops, something went wrong. The error message sounds a bit confusing, but with help of the command winrm get winrm/config on the windows node, I can easily see the problem(s)
PS C:\Users\Administrator> winrm get winrm/config
Config    MaxEnvelopSizekb = 500
...
   Service
   ...
      AllowUnencrypted = false
      Auth
         Basic = false
         Kerberos = true
         Negotiate = true
         Certificate = false
         CredSSP = false
         CbtHardeningLevel = Relaxed
      DefaultPorts
         HTTP = 5985
         HTTPS = 5986
...
As I already mentioned above, I want to use basic authentication over http, but basic authentication is not enabled on the Windows node and in group_vars/windows.yml the wrong port (https instead http) is specified. So let’s fix both. Enabling the basic mode on the Windows node can be done with the Set-Item command
PS C:\Users\Administrator> Set-Item -Path "WSMan:\localhost\Service\Auth\Basic" -value TrueDoes it work now? Let’s see …
[adrian@master]$ ansible windows -m win_ping -vvvv
Using /etc/ansible/ansible.cfg as config file
  Loaded callback minimal of type stdout, v2.0
  <win001> ESTABLISH WINRM CONNECTION FOR USER: Administrator on PORT 5985 TO win001
  win001 | UNREACHABLE! => {
  "changed": false,
  "msg": "plaintext: the specified credentials were rejected by the server",
  "unreachable": true
 }
No it does not. Now, this error message is also very confusing, as I am sure my credentials in the group_vars/windows.yml are fine. It turns out they are. The problem is actually, that the connection is un-encrypted but this is not allowed by the service (see above). Therefore we also have to fix this:
PS C:\Users\Administrator> Set-Item -Path "WSMan:\localhost\Service\AllowUnencrypted" -value TrueAfter this I finally succeed:
[adrian@master]$ ansible windows -m win_ping
win001 | SUCCESS => {
    "changed": false,
    "ping": "pong"
}
Now I can start doing the real stuff using Playbooks etc. Stay tuned for more.