Docker - what is it?
Posted in container on December 5, 2016 by Adrian Wyssmann ‐ 13 min read
Introduction
The open source project Docker is a “lightweight” virtualization providing independent containers to run with a single Linux instance without the overhead of having virtual machines. It uses resource isolation features from the Linux kernel such as cgroups, kernel namespaces and an overlay file system. As of today these are aufs, btrfs, devicemapper, vfs and overlay.
Cgroups (Control Groups) is a kernel feature which provides capabilities of limiting, prioritization, accounting and controlling of resources like (CPU, memory, disk I/O, network, etc.)collection of processes.
Namespaces is a kernel feature which allows to group (partitions) resources which then processes may see or not. What the docu says:
A namespace wraps a global system resource in an abstraction that makes it appear to the processes within the namespace that they have their own isolated instance of the global resource. Changes to the global resource are visible to other processes that are members of the namespace, but are invisible to other processes. One use of namespaces is to implement containers.
A overlay file system tries to present a single filesystem which in reality consist of different layers. It is presented to the user as a normal filesystem but actually make it indistinguishable which object is accessed. https://www.kernel.org/doc/Documentation/filesystems/overlayfs.txt states
An overlay filesystem combines two filesystems - an ‘upper’ filesystem and a ’lower’ filesystem. When a name exists in both file systems, the object in the ‘upper’ filesystem is visible while the object in the ’lower’ filesystem is either hidden or, in the case of directories,merged with the ‘upper’ object.
Differences to “full” virtualization
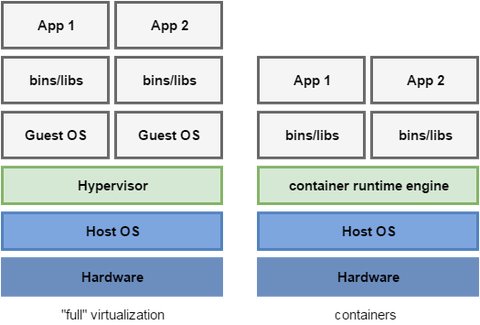
You may be familiar with other virtualization techniques like KVM, VMWare or Hyper-V. These techniques are considered as full virtualization and have an additional layer called Hypervisor between the hardware and the virtual operating platform on which the OS is installed. The main differences to the operating-system-level virtualization used by Docker are
- instances on “operating-system-level” share the same kernel i.e. it is not possible to run other OS than the host (though you may have different distributions with the same kernel)
- full virtualized system get its own dedicated set of resource allocation
- full virtualized are more isolated but therefore also require more resources (e.g. more hw resources, more disk space)
- startup times of full virtualized is minutes, whereas docker containers are up and running in seconds
Terminolog
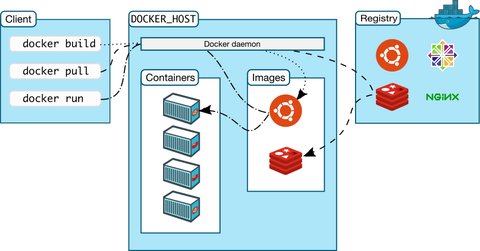
To get started it might be good to understand some of the terminology
Docker Engine
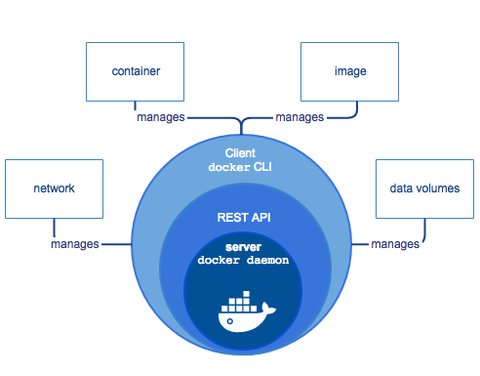
Docker Engine is a client-server application with these major components:
- A server or better a daemon process (
dockerd) which listen for Docker API requests and manage Docker objects such as images, containers, networks, and volumes. - A REST API for programs to talk and interact with the daemon
- A command line interface (CLI) client (the
dockercommand) which is the primary way a user interacts with docker
Docker Objects
Images
An image is a read-only template with instructions for the docker daemon to create a container. Such images usually are based on another image with additional customization according to your needs. Each modification of an image creates a new layer reflecting the changes made to the previous image - so an image is consists of several layers.
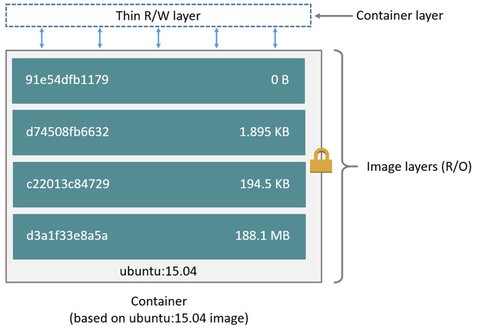
For example, you may build an image which is based on the
ubuntuimage, but installs the Apache web server and your application, as well as the configuration details needed to make your application run
You can create your own images by describing it with a simple syntax in a so called “Dockerfile”. Each instruction (RUN, COPY, …) in your Dockerfile creates an additional layer on top of your base image which will be rebuilt. The rest of the underlying image layers - once present on your host system - stay as they are. This makes docker very lightweight.
More details on working with images can be found at https://docs.docker.com/engine/userguide/eng-image/dockerfile_best-practices/
Containers
Containers are runnable instances of images. As images only contain read-only layers, a running container also contains a writable layer where all changes are happening. So when you for example add an additional file to a directory, this file is stored in the writable layer for that container.
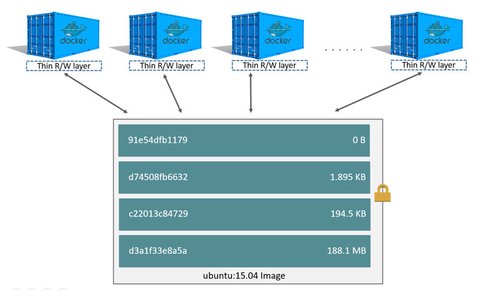
A container is by default isolated but by means of configuring networking and storage this isolation can be reduced. For example multiple containers can be attached to the same virtual network so that containers can see each other. Or volumes can be made available to different containers so they share the same data. Here some more references to read through: https://docs.docker.com/engine/userguide/storagedriver/imagesandcontainers/#content-addressable-storage
Instances on “operating-system-level” share the same kernel i.e. it is not possible to run other OS than the host (though you may have different distributions with the same kernel)
- full virtualized system get its own dedicated set of resource allocation
- full virtualized are more isolated but therefore also require more resources (e.g. more hw resources, more disk space)
- startup times of full virtualized is minutes, whereas docker containers are up at seconds
Services
In a distributed application, different pieces of the app are called services - in context of Docker it basically means “containers in production". Each service (or container in production) is based on an image but customized on how it run e.g. which commands to execute inside the running container, how much resources a container can consume, how much replicas of the same container are to be run, etc.
This “how” can be described in a docker-compose.yml file which is a YAML file. More details can be found at https://docs.docker.com/get-started/part3/#introduction
Swarm
In Docker you can join a group of machines running Docker - called nodes - into a cluster which is called swarm. The key concept behind a swarm is to simplify management and orchestration of multi-container and multi-machine applications. Within a swarm one of the nodes has to be defined as manager node aka. swarm manager.
The manager nodes dispatches tasks to worker nodes and erforms the orchestration and cluster management in order to keep the swarm at it’s desired state. When working with swarms all your commands you issue with docker command are managed by a swarm manager.
Stack
A stack is a group of interrelated services that share dependencies, and can be orchestrated and scaled together. Stacks are as well described in a
docker-compose.yml_ file or more concretely, one speak about a stack when the adocker-compose.ymlcontains more than one service definition. Orchestrating and scaling is nothing else than working with swarms.
Docker Registry
A docker registry is a server application which lets you store and distribute Docker images.
The most obvious one is the public Docker Hub however there are others available. Especially companies may consider carefully on what we publish publicly so it makes sense to maintain a private registry.
Deep-Dive
Images
Remember,
Each Docker image references a list of read-only layers that represent filesystem differences. Layers are stacked on top of each other to form a base for a container’s root filesystem
Let’s have a look with a concrete example. When I pull an image from a docker registry, you can see that there are different chunks downloaded - four in total:
[me@dockerhost ~]$ docker pull ubuntu:15.04
15.04: Pulling from library/ubuntu

9502adfba7f1: Pull complete
4332ffb06e4b: Pull complete
2f937cc07b5f: Pull complete
a3ed95caeb02: Pull complete
Digest: sha256:2fb27e433b3ecccea2a14e794875b086711f5d49953ef173d8a03e8707f1510f
Status: Downloaded newer image for ubuntu:15.04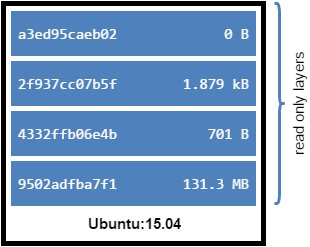
These are image layers and the docker storage driver combines these layers to a unified view - remember: we take advantage of an overlay fs. As we use the default storage driver AUFS we may have a look at the directory /var/lib/docker/aufs/layers which contains metadata about how image layers are stacked. I currently do not have any other images pulled, so there are only 6 files. 4 files correspond to the four one we recently downloaded with the ubuntu image.
[me@dockerhost /var/lib/docker/aufs/layers]$ ls -l
-rwxr-xr-x 1 root root 850 Dez  1 09:30 011ba3a57ce58d6a108a2c3a400a32fcb80b03b14f0b78ffb6bba4e42b0e159e
-rwxr-xr-x 1 root root 780 Dez  1 09:30 011ba3a57ce58d6a108a2c3a400a32fcb80b03b14f0b78ffb6bba4e42b0e159e-init
-rw-r--r-- 1 root root 195 Dez  2 15:04 28248545da3ebfd2bbd91cceb880cc23154499e067c06df1a991abec1fa63ba3
-rw-r--r-- 1 root root   0 Dez  2 15:04 2be0cddd012a83ed438eadfa561cedeeabec3c8bae393a33aee36e676dd31753
-rw-r--r-- 1 root root  65 Dez  2 15:04 5a34d76efb42c76d8569b90a59aa7552d0b19374823dd2841de9eccd35609af0
-rw-r--r-- 1 root root 130 Dez  2 15:04 5fb71301bd253332e671cb367a19c10683f96638f02ae92d6c881522fe7329ec
Actually we can see the image layers of an image by docker inspect IMAGE but this shows a digest calculated with an sha256 algorithm, whereas the filename in /var/lib/docker/aufs/layers or folder name in /var/lib/docker/aufs/diff is named after a randomly generated ‘cache ID’.
[me@dockerhost /var/lib/docker/aufs/layers]$ docker inspect ubuntu:15.04
...
"RootFS": {
"Type": "layers",
"Layers": [
"sha256:3cbe18655eb617bf6a146dbd75a63f33c191bf8c7761bd6a8d68d53549af334b",
"sha256:84cc3d400b0d610447fbdea63436bad60fb8361493a32db380bd5c5a79f92ef4",
"sha256:ed58a6b8d8d6a4e2ecb4da7d1bf17ae8006dac65917c6a050109ef0a5d7199e6",
"sha256:5f70bf18a086007016e948b04aed3b82103a36bea41755b6cddfaf10ace3c6ef"
]
...
So the connection is not obvious cause the link between the layer and its cache ID is maintainer only by the Docker Engine. However, let’s take a random layer and see what is the content of it
[me@dockerhost /var/lib/docker/aufs/layers]$ cat 5a34d76efb42c76d8569b90a59aa7552d0b19374823dd2841de9eccd35609af0
2be0cddd012a83ed438eadfa561cedeeabec3c8bae393a33aee36e676dd31753
[me@dockerhost /var/lib/docker/aufs/layers]$ cat 2be0cddd012a83ed438eadfa561cedeeabec3c8bae393a33aee36e676dd31753
[me@dockerhost /var/lib/docker/aufs/layers]$
So we see that layer 5a34d76efb42c76d8569b90a59aa7552d0b19374823dd2841de9eccd35609af0 has a lower image layer 2be0cddd012a83ed438eadfa561cedeeabec3c8bae393a33aee36e676dd31753 whereas later has none below. Now let’s examine the base image layer 2be0cddd012a83ed438eadfa561cedeeabec3c8bae393a33aee36e676dd31753- image layers and their contents are stored under /var/lib/docker/aufs/diff/.
[me@dockerhost /var/lib/docker/aufs/diff]$ 2be0cddd012a83ed438eadfa561cedeeabec3c8bae393a33aee36e676dd31753
bin  boot  dev  etc  home  lib  lib64  media  mnt  opt  proc  root  run  sbin  srv  sys  tmp  usr  var
[me@dockerhost /var/lib/docker/aufs/diff]$ du -sh 2be0cddd012a83ed438eadfa561cedeeabec3c8bae393a33aee36e676dd31753
142M    2be0cddd012a83ed438eadfa561cedeeabec3c8bae393a33aee36e676dd31753
So that looks like a complete Linux file system. The second layer therefore will have slightly less content
[me@dockerhost /var/lib/docker/aufs/diff]$ ls 5a34d76efb42c76d8569b90a59aa7552d0b19374823dd2841de9eccd35609af0
etc  sbin  usr  var
[me@dockerhost /var/lib/docker/aufs/diff]$ du -sh 5a34d76efb42c76d8569b90a59aa7552d0b19374823dd2841de9eccd35609af0
80K     5a34d76efb42c76d8569b90a59aa7552d0b19374823dd2841de9eccd35609af0
You actually may also use the history command to show the image layers for a specific docker image.
[me@dockerhost ~] docker history ubuntu:15.04
IMAGE               CREATED             CREATED BY                                      SIZE                COMMENT
d1b55fd07600        10 months ago       /bin/sh -c #(nop) CMD ["/bin/bash"]             0 B
<missing>           10 months ago       /bin/sh -c sed -i 's/^#\s*\(deb.*universe\)$/   1.879 kB
<missing>           10 months ago       /bin/sh -c echo '#!/bin/sh' > /usr/sbin/polic   701 B
<missing>           10 months ago       /bin/sh -c #(nop) ADD file:3f4708cf445dc1b537   131.3 MB
Unfortunately due to the introduction of the content addressable storage model with Docker 1.10 some image information shows <missing>. Images layers are stored locally and shared so this way, for images which share the some of already downloaded image layers, docker daemon only needs to download missing image layers, which shares disk space and bandwidth for downloading. If we create our own image based on the ubuntu:15.04 image we actually can see this. I create a Dockerfile with the following content:
FROM ubuntu:15.04

RUN echo "Hello world" > /tmp/newfile
Then I build the image using the build command
[me@dockerhost ~]$ docker build -t ubuntu-1504-test .
Sending build context to Docker daemon 2.048 kB
Step 1 : FROM ubuntu:15.04
---> d1b55fd07600
Step 2 : RUN echo "Hello world" > /tmp/newfile
---> Running in 386c49686f12
---> b9d47348ea94
Removing intermediate container 386c49686f12
Successfully built b9d47348ea94
With docker images we can see the newly created image
[me@dockerhost ~]$ % docker images
REPOSITORY          TAG                 IMAGE ID            CREATED              SIZE
ubuntu-1504-test    latest              b9d47348ea94        About a minute ago   131.3 MB
ubuntu              15.04               d1b55fd07600        10 months ago        131.3 MB
Under /var/lib/docker/aufs/layers we can see that we have a new image layer, which is on top of the already existing layers from the ubuntu:15.04 image:
[me@dockerhost /var/lib/docker/aufs/layers]$ cat d959ad618e458e6636cd499990e53f94a1f0e61336243a6ec4310009b79ed432
28248545da3ebfd2bbd91cceb880cc23154499e067c06df1a991abec1fa63ba3
5fb71301bd253332e671cb367a19c10683f96638f02ae92d6c881522fe7329ec
5a34d76efb42c76d8569b90a59aa7552d0b19374823dd2841de9eccd35609af0
2be0cddd012a83ed438eadfa561cedeeabec3c8bae393a33aee36e676dd31753
In /var/lib/docker/aufs/diff we also can see the content of the layer our newly added file /tmp/newfile
[me@dockerhost /var/lib/docker/aufs/diffs]$ tree d959ad618e458e6636cd499990e53f94a1f0e61336243a6ec4310009b79ed432/
d959ad618e458e6636cd499990e53f94a1f0e61336243a6ec4310009b79ed432/
+-- tmp
+-- newfile

1 directory, 1 file
[me@dockerhost /var/lib/docker/aufs/diffs]$ cat d959ad618e458e6636cd499990e53f94a1f0e61336243a6ec4310009b79ed432/tmp/newfile
Hello world
The history command shows the same information:
[me@dockerhost ~]$ docker history ubuntu-1504-test
IMAGE               CREATED             CREATED BY                                      SIZE                COMMENT
b9d47348ea94        About an hour ago   /bin/sh -c echo "Hello world" > /tmp/newfile    12 B
d1b55fd07600        10 months ago       /bin/sh -c #(nop) CMD ["/bin/bash"]             0 B
<missing>           10 months ago       /bin/sh -c sed -i 's/^#\s*\(deb.*universe\)$/   1.879 kB
<missing>           10 months ago       /bin/sh -c echo '#!/bin/sh' > /usr/sbin/polic   701 B
<missing>           10 months ago       /bin/sh -c #(nop) ADD file:3f4708cf445dc1b537   131.3 MB
Containers
Now that we understand how images work, lets have a look what is a container:
The major difference between a container and an image is the top writable layer. All writes to the container that add new or modify existing data are stored in this writable layer. When the container is deleted the writable layer is also deleted. The underlying image remains unchanged.
Let’s see what happens when we start a container.
[me@dockerhost /var/lib/docker/aufs/layers]$ docker run -dit ubuntu-1504-test:latest bash
f438aefa681ad11c90a306e3ef9b8d2b488f6eeca07ee91da60cfc936e24074b
[me@dockerhost /var/lib/docker/aufs/layers]$ docker ps
CONTAINER ID        IMAGE                     COMMAND             CREATED             STATUS              PORTS               NAMES
f438aefa681a        ubuntu-1504-test:latest   "bash"              7 minutes ago       Up 7 minutes                            furious_euclid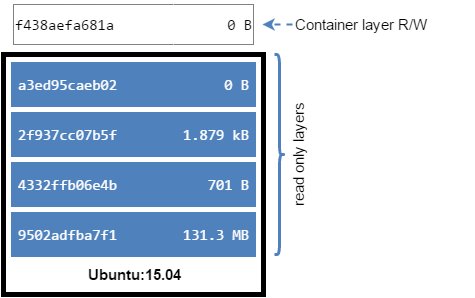
A new container is created and under /var/lib/docker/containers/<container-id> the container’s metadata is stored. You may have a look at the config.v2.json or use docker inspect f438aefa681ad11c90a306e3ef9b8d2b488f6eeca07ee91da60cfc936e24074b to get more information about the container itself.
[me@dockerhost /var/lib/docker/aufs/layers]$ sudo ls -l /var/lib/docker/containers
total 8
drwxr-xr-x 2 root root 4096 Dez  1 09:30 011ba3a57ce58d6a108a2c3a400a32fcb80b03b14f0b78ffb6bba4e42b0e159e
drwx------ 3 root root 4096 Dez  2 17:03 f438aefa681ad11c90a306e3ef9b8d2b488f6eeca07ee91da60cfc936e24074b
[me@dockerhost /var/lib/docker/aufs/layers]$ sudo ls -l /var/lib/docker/containers/f438aefa681ad11c90a306e3ef9b8d2b488f6eeca07ee91da60cfc936e24074b
config.v2.json
f438aefa681ad11c90a306e3ef9b8d2b488f6eeca07ee91da60cfc936e24074b-json.log
hostconfig.json
hostname
hosts
resolv.conf
resolv.conf.hash
shm
We learned that the container differs from the base image with a writable image layer, so let’s see what we have in the layers directory:
[me@dockerhost /var/lib/docker/aufs/layers]$ ls
011ba3a57ce58d6a108a2c3a400a32fcb80b03b14f0b78ffb6bba4e42b0e159e
011ba3a57ce58d6a108a2c3a400a32fcb80b03b14f0b78ffb6bba4e42b0e159e-init
28248545da3ebfd2bbd91cceb880cc23154499e067c06df1a991abec1fa63ba3
2be0cddd012a83ed438eadfa561cedeeabec3c8bae393a33aee36e676dd31753
5a34d76efb42c76d8569b90a59aa7552d0b19374823dd2841de9eccd35609af0
5fb71301bd253332e671cb367a19c10683f96638f02ae92d6c881522fe7329ec
7a307f7b8242955e08d62c09989deb6cec07789899dfdd8cd4ff107b5c151fef
7a307f7b8242955e08d62c09989deb6cec07789899dfdd8cd4ff107b5c151fef-init
d959ad618e458e6636cd499990e53f94a1f0e61336243a6ec4310009b79ed432
A new image layer is created and image is mounted under /var/lib/docker/aufs/mnt/ providing a single unified view:
[me@dockerhost /var/lib/docker/aufs/mnt]$ ls 7a307f7b8242955e08d62c09989deb6cec07789899dfdd8cd4ff107b5c151fef
bin  boot  dev  etc  home  lib  lib64  media  mnt  opt  proc  root  run  sbin  srv  sys  tmp  usr  var
Therefore, when we have a look at our tmp folder, we actually should see our newfile:
[me@dockerhost /var/lib/docker/aufs/mnt]$ tree 7a307f7b8242955e08d62c09989deb6cec07789899dfdd8cd4ff107b5c151fef/tmp
7a307f7b8242955e08d62c09989deb6cec07789899dfdd8cd4ff107b5c151fef/tmp
+-- newfile
We now can attach to the running container and create an additional file, let’s say newfile2 in the directory /tmp:
[me@dockerhost /var/lib/docker/aufs/mnt]$ docker attach f438aefa681a
root@f438aefa681a:/## touch /tmp/newfile2
root@f438aefa681a:/## echo 'test test test' > /tmp/newfile2
root@f438aefa681a:/## cat /tmp/newfile2
test test test
And we add some more content to the already existing “newfile”:
root@f438aefa681a:/## echo 'test test test' >> /tmp/newfile
root@f438aefa681a:/## cat /tmp/newfile
Hello world
test test test
When we look outside of the container, we can see the changes we made in the “writable layer” and accordingly presented in the unified view:
[me@dockerhost /var/lib/docker/aufs/mnt]$ tree 7a307f7b8242955e08d62c09989deb6cec07789899dfdd8cd4ff107b5c151fef/tmp
7a307f7b8242955e08d62c09989deb6cec07789899dfdd8cd4ff107b5c151fef/tmp
+-- newfile
+-- newfile2
[me@dockerhost /var/lib/docker/aufs/mnt]$ cat 7a307f7b8242955e08d62c09989deb6cec07789899dfdd8cd4ff107b5c151fef/tmp/newfile
Hello world
test test test
So when we look at the image layers, you can see the changes in the
[me@dockerhost /var/lib/docker/aufs/mnt]$ tree ../diff/7a307f7b8242955e08d62c09989deb6cec07789899dfdd8cd4ff107b5c151fef/tmp
7a307f7b8242955e08d62c09989deb6cec07789899dfdd8cd4ff107b5c151fef/tmp
+-- newfile
+-- newfile2
But the latest image layer d959ad618e458e6636cd499990e53f94a1f0e61336243a6ec4310009b79ed432 still shows it’s original content
[me@dockerhost /var/lib/docker/aufs/mnt]$ tree ../diff/d959ad618e458e6636cd499990e53f94a1f0e61336243a6ec4310009b79ed432/
d959ad618e458e6636cd499990e53f94a1f0e61336243a6ec4310009b79ed432/
+-- tmp
+-- newfile
Same effect when we delete newfile within the container… so on the “writable layer” the file does not exist anymore
[me@dockerhost /var/lib/docker/aufs/mnt]$ tree ../diff/7a307f7b8242955e08d62c09989deb6cec07789899dfdd8cd4ff107b5c151fef/tmp
7a307f7b8242955e08d62c09989deb6cec07789899dfdd8cd4ff107b5c151fef/tmp
+-- newfile2
Whereas on the image layer we still can see the file
[me@dockerhost /var/lib/docker/aufs/mnt]$ tree ../diff/d959ad618e458e6636cd499990e53f94a1f0e61336243a6ec4310009b79ed432/
d959ad618e458e6636cd499990e53f94a1f0e61336243a6ec4310009b79ed432/
+-- tmp
+-- newfile
When we exit the container, the container is un-mounted, therefore you cannot see anything
[me@dockerhost /var/lib/docker/aufs/mnt]$ ls d959ad618e458e6636cd499990e53f94a1f0e61336243a6ec4310009b79ed432
[me@dockerhost /var/lib/docker/aufs/mnt]$
But we still have the content in the writable image layer
[me@dockerhost /var/lib/docker/aufs/mnt]$ tree ../diff/7a307f7b8242955e08d62c09989deb6cec07789899dfdd8cd4ff107b5c151fef/tmp
7a307f7b8242955e08d62c09989deb6cec07789899dfdd8cd4ff107b5c151fef/tmp
+-- newfile2
As long as the container is not destroyed, I can start it again and my changes are preserved. When I remove the container also it’s writable image layer will be gone and my changes made are lost.
[me@dockerhost /var/lib/docker/aufs/diff]$ docker rm f438aefa681a
f438aefa681a
[me@dockerhost /var/lib/docker/aufs/diff]$ ls -l ../diff
total 28
drwxr-xr-x  5 root root 4096 Dez  2 11:51 011ba3a57ce58d6a108a2c3a400a32fcb80b03b14f0b78ffb6bba4e42b0e159e
drwxr-xr-x  6 root root 4096 Dez  1 09:30 011ba3a57ce58d6a108a2c3a400a32fcb80b03b14f0b78ffb6bba4e42b0e159e-init
drwxr-xr-x  2 root root 4096 Dez  2 15:04 28248545da3ebfd2bbd91cceb880cc23154499e067c06df1a991abec1fa63ba3
drwxr-xr-x 21 root root 4096 Dez  2 15:04 2be0cddd012a83ed438eadfa561cedeeabec3c8bae393a33aee36e676dd31753
drwxr-xr-x  6 root root 4096 Dez  2 15:04 5a34d76efb42c76d8569b90a59aa7552d0b19374823dd2841de9eccd35609af0
drwxr-xr-x  3 root root 4096 Dez  2 15:04 5fb71301bd253332e671cb367a19c10683f96638f02ae92d6c881522fe7329ec
drwxr-xr-x  3 root root 4096 Dez  2 15:26 d959ad618e458e6636cd499990e53f94a1f0e61336243a6ec4310009b79ed432
Now I have a quite well understanding on what images and containers are and how the overlay fs works.