How to install WSL on Windows 2019 server behind a corporate proxy
Posted on March 1, 2022 by Adrian Wyssmann ‐ 4 min read
At my current employer we have to use Windows Server virtual machines as development environments. For me as a Linux fanboy, this is not a very nice experience, hence why not use WSL?
Introduction
Sadly we have still Windows 2019 Servers, which only supports WSL1 since build 1709 and unfortunately not WSL2. Luckily we now have 1709 builds, so we can at least use WSL1. Also are we sitting behind a corporate proxy, so installation and configuration is slightly more difficult.
Installation
We also don’t have a Windows app store available, so we have to manually install WSL1 following the WSL Installation Guide
Open Powershell as an Administrator and run
Enable-WindowsOptionalFeature -Online -FeatureName Microsoft-Windows-Subsystem-LinuxRestart your Server
Download the Linux version of your choice We will download Ubuntu 20.04 for WSL1
$distro="wslubuntu2004"
$outfile="install-$distro.zip"
$appfile="Ubuntu_2004.2021.825.0_x64"
Invoke-WebRequest -Uri https://aka.ms/$distro -OutFile .\$outfile -UseBasicParsing
Download has started, it can take 10 minutes to download the zip file
Extract the file
Expand-Archive .\$outfile .\$distro
cd .\$distro
For ubuntu other steps are necessary and we have to further extract archives
Rename-Item .\$appfile.appx .\$appfile.zip
Expand-Archive .\$appfile.zip .\$distro
cd .\$distro
On normal windows machines run:
Add-AppxPackage .\ubuntu2004.appxAfter that you can start Ubuntu20.04 on Windows WSL1 and create your user
.\ubuntu.exe
Fix common problems
Fix vim and nano text editor blank screen problem
If you get a blank screen when opening an editor or using screen, you are facing this issue and hence you have to do add the following to your ~/.bashrc:
export TERM=xterm-colorFix vim and nano text editor blank screen problem
If you get permission errors when running screen in WSL1 you can add the following lines into your ~/.bashrc
sudo /etc/init.d/screen-cleanup startGet Distro ready to work with your corporate environment
In order to work with the proxy and self-signed certificates there are some more steps necessary
Add corporate certificates
If you have self-signed corporate certificates, they have to be added to the trusts in your distro.
- Copy certificates to
/usr/local/share/ca-certificates/(Ubuntu, Debian) or/usr/share/pki/trust/anchors/(OpenSuse) - Run
sudo update-ca-certificatesorupdate-ca-certificatesdepending of your distro
Configure package source
I assume - as we do - you use something like [Artifactory] as a repository proxy. So what is required
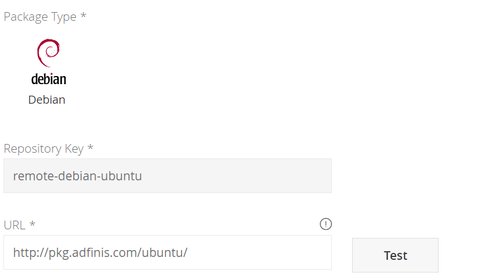
Ensure [Artifactory] can access the package repo. I don’t recommend to use the official url but directly pin one of the official mirrors.
If you use the official package url, you still don’t know which mirror Artifactory will pick. So, all possible mirrors have to be whitelisted so that Artifactory can access them. In our case we configured Artifactory to use http://pkg.adfinis.com/ubuntu/ as the remote url

Once this works, you can configure your distribution to use your [Artifactory]
sudo sed -i 's|https?://archive.ubuntu.com/ubuntu|https://artifactory.intra/artifactory/remote-debian-ubuntu|g' /etc/apt/sources.list
sudo sed -i 's|https?://security.ubuntu.com/ubuntu|https://artifactory.intra/artifactory/remote-debian-ubuntu|g' /etc/apt/sources.list
Details may vary, depending on your distribution of choice, for OpenSuse it would be like this:
find /etc/zypp/repos.d/ -type f -name '*' -exec sed -i 's|http://download.opensuse.org|https://artifactory.intra/artifactory/remote-rpm-opensuse|g' {} +
Configure Proxy
For certain activities you may be allowed to access the internet, hence, ensure you configure your proxy settings, by adding something like this to ~/.bashrc
export http_proxy="myproxy.intra:8888" && export https_proxy="myproxy.intra:8888" && export no_proxy="localhost,127.0.0.1,intra,..."Best Practices
There is a full list of WSL1 Best practices, however here are some which I find useful
To list all installed distributions
To list Linux distributions you can run:
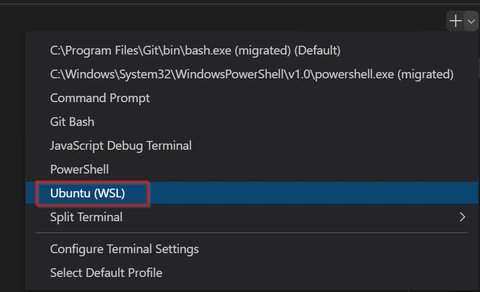
wslconfig /list /allIntegrated Terminal in VS Code
You can configure that in the settings as follows:
"terminal.integrated.profiles.windows": {
    "Ubuntu (WSL)": {
        "path": "wsl.exe",
        "args": ["-d", "ubuntu"]
    },
     "Opensuse Tumbleweed (WSL)": {
        "path": "wsl.exe",
        "args": ["-d", "openSUSE-Tumbleweed"]
    }
},  },
...
Git
Git has to be configured so it uses the proxy for external repos and the credential manager
# Credential Helper Settings
# http://microsoft.github.io/Git-Credential-Manager-for-Windows/Docs/Configuration.html#httpproxy
git config --global credential.github.com.httpProxy http://myproxy.intra:8888
git config --global credential.github.com.httpsProxy http://myproxy.intra:8888
git config --global credential.modalPrompt false
git config --global credential.gitlab.com.httpProxy http://myproxy.intra:8888
git config --global credential.gitlab.com.httpsProxy http://myproxy.intra:8888
git config --global credential.modalPrompt false

# https://docs.microsoft.com/en-us/windows/wsl/tutorials/wsl-git
git config --global credential.helper "/mnt/c/Program\ Files/Git/mingw64/libexec/git-core/git-credential-manager-core.exe"
